
How to Disassemble a Peloton Bike for Moving

How to Disassemble a Peloton Bike for Moving: Complete Austin Guide

Taking a Peloton apart for a move means removing the touchscreen, pedals, seat, handlebars, and any removable frame pieces so the bike can be packed, transported, and reassembled without harming electronics or mechanical parts. Careful disassembly keeps the screen and sensors safe, protects warranty-sensitive components, and lowers the chance of scratches or bent crank arms during transit. This guide explains when hiring pros makes sense in Austin, lists the tools and packing supplies you'll need, walks through step-by-step disassembly and packing tips, and finishes with reassembly checks and local quoting information. You’ll get practical actions—how to power down and detach the screen, correct pedal removal directions, how to label hardware for reassembly, and which packing methods best protect the display and frame. Want to skip the DIY risk and get help from local specialists? Request a free quote. The sections below cover professional vs. DIY choices, tool recommendations, a clear How‑To disassembly sequence, component-specific packing guidance, reassembly safety checks, and how Mountain Movers handles Peloton moves in Austin.
Why Choose Professional Peloton Moving Services in Austin?
Hiring professionals for your Peloton move lowers the risk to valuable parts by combining trained handling, purpose-built packing, and insured transport that covers electronics and mechanical pieces. A professional moving team knows how to protect the screen, route and secure power/data cables, and remove pedals and cranks without stripping threads—cutting down the chance of costly repairs. Local Austin movers bring added benefits: knowledge of traffic and routes, experience with narrow stairwells and elevator limits, and flexible scheduling to avoid last-minute headaches. For many owners the choice is straightforward: DIY can save money for very short, simple moves, but pros buy you time, reduce damage risk, and give peace of mind. If a professional crew sounds right for you, request a free quote.
What Are the Benefits of Hiring Expert Peloton Movers?
Working with expert Peloton movers gives you predictable protection through insured transport, trained handling of sensitive electronics, and efficient logistics that minimize downtime. Pros disassemble and reassemble to Peloton‑compatible tolerances, which reduces the chance of misaligned mounts or stripped threads that can create sensor faults or fit issues. Experienced teams use the right packing materials—rigid backing for screens, padded covers for handlebars, and sealed hardware kits—so scratches and bent parts are far less likely. Finally, a trusted local provider cuts planning time for the owner and shortens the gap between pickup and being ready to ride again, which is especially helpful for renters or households on tight schedules.
Moving specialty sports equipment like a Peloton requires focused logistics and careful handling—another reason to consider professional services.
Sport Equipment Logistics: Movement, Storage, and Special Handling
This paper explores a niche yet under-examined area where logistics meets sport management: sport equipment logistics. It defines the field, outlines typical organizational structures, and explains how operations are managed. The scope covers the movement and storage of equipment for athletes and events, and it highlights logistics characteristics unique to sport gear, such as assortment, special handling processes, and handling challenges at events.
How does the ball get onto the pitch? Equipment logistics management in sport organizations, C Pott, 2025
When Should You Consider DIY Peloton Disassembly?
DIY disassembly is a good option when the move is short, you have clear access and the right tools, and you’re comfortable with labeling parts and following torque details for safe reassembly. Typical DIY scenarios include moving within the same floor, using a vehicle large enough to keep the bike upright and secured, and having an assistant available for lifting the screen. Avoid DIY on long-distance moves, when building access is tight (narrow staircases, sharp corners), or if you own a Bike+ or a model with heavier integrated electronics. If any of those risk factors apply, hiring pros will likely prevent downtime and protect your bike’s performance and value.
What Tools Are Essential for Disassembling a Peloton Bike?
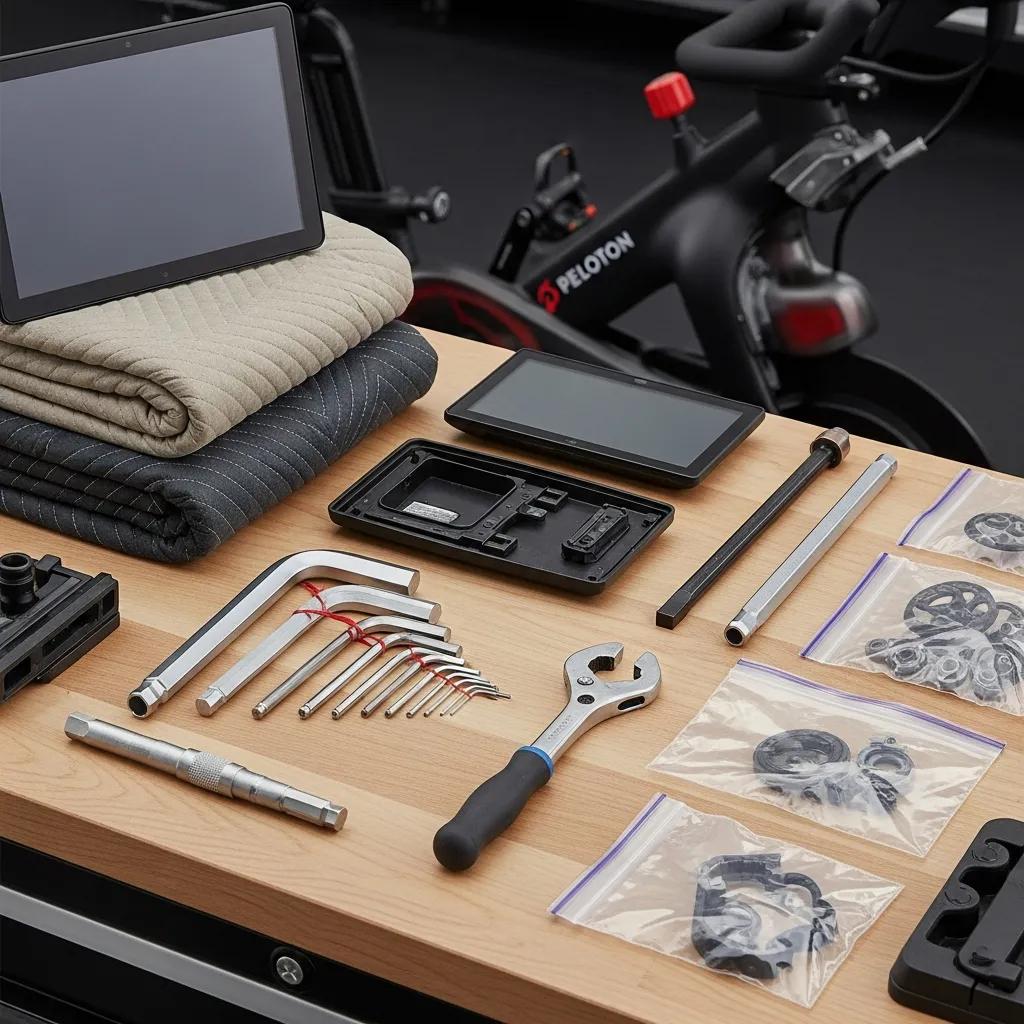
The right toolkit combines precision hand tools and protective packing gear so parts are removed cleanly and protected during handling. You’ll need Allen wrenches and a pedal wrench for drivetrain components, a Phillips or Torx driver for screen mount screws, and protective items like moving blankets and a rigid backing for the display. Choosing the correct tools helps prevent stripped fasteners and maintains thread integrity on pedals and crank arms, which preserves sensor alignment for reassembly.
Use these hardware and protective tools so each step finishes neatly and parts are stored safely for the move.
- 4mm and 6mm Allen wrenches: Remove adjustment bolts and common mounting screws.
- 15mm pedal wrench or adjustable pedal wrench: Provide leverage for pedal removal and protect crank faces.
- Phillips #2 or Torx driver: Access screen-mount screws and smaller fasteners.
- Moving blankets and rigid cardboard or foam board: Shield the screen from impact and scratches.
- Zip-top bags and a labeled container: Keep screws and small parts organized for reassembly.
These tools let you detach hardware without damage and prepare parts for transport; the table below summarizes each tool and its intended use.
This comparison helps you gather the right kit before you begin; next, we’ll show how to use these tools in sequence.
Which Allen Wrenches and Pedal Wrenches Do You Need?
Pick hardened Allen wrenches in common Peloton sizes—typically 4mm for adjustment bolts and 6mm for mounting hardware—so you can remove seat rails, collars, and accessories without rounding heads. For pedals, a 15mm pedal wrench is ideal because it fits the thin flats and gives good leverage; a long-handled adjustable wrench can work if it reaches the pedal flats. Note that the left pedal is reverse-threaded—turn clockwise to loosen—so confirm pedal orientation before applying force to avoid cross-threading. As you remove washers and bolts, label them to keep a clean parts inventory for reassembly.
What Packing Materials Ensure Safe Peloton Transport?

Packing needs vary by component: a rigid backing with bubble wrap protects the screen, padded covers shield handlebars and seat posts, and sealed bags keep hardware organized. Using several layers of bubble wrap plus a rigid sheet prevents pressure points on the touchscreen, while quilted moving blankets reduce frame abrasion. For heavier components or long trips, quality packing reduces vibration and localized shocks that can harm sensors. After packing, place small items in a clearly labeled container so reassembly is quick and accurate.
This table maps specific materials to components so you can gather supplies and run a damage-minimizing packing plan on moving day.
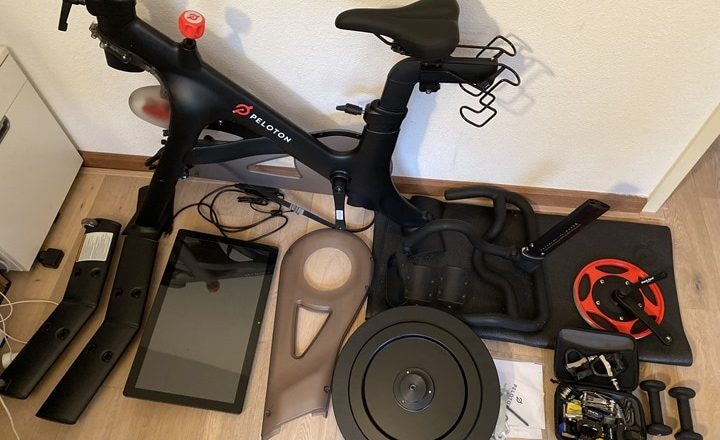
How to Disassemble Your Peloton Bike Step-by-Step
Following a clear sequence lowers the chance of lost hardware or accidental electrical damage: power down, remove the screen, detach pedals, lower and remove the seat and handlebars, then separate any removable frame sections. A consistent order protects sensors and keeps weight manageable for lifting. Start by powering down and preparing your workspace, then follow the ordered steps below to reduce stress on mounts and wiring.
- Power down the Peloton and unplug all cables before touching mounts.
- Remove the touchscreen with a two-person lift after disconnecting power/data cables.
- Loosen and remove the pedals, noting left-side reverse threading.
- Lower or remove the seat and unbolt handlebars, storing adjustment knobs.
- Disassemble frame joints only if necessary and if comfortable doing so; otherwise, leave the frame intact.
These steps protect component integrity and prepare everything for secure packing and transport.
How Do You Power Down and Prepare the Area?
Start by powering off the Peloton using its normal shutdown so the display and sensors are inactive, then unplug the power cable and any accessories to remove electrical hazards. Clear an area at least twice the bike’s footprint so you have space to set parts down safely and put a soft, level surface—like a moving blanket or foam pad—down to avoid scratches. Gather tools and zip-top bags, set aside a labeled parts container, and recruit an assistant for lifting the screen. Preparing the workspace avoids rushed handling and lets you work methodically.
What Is the Process for Removing the Peloton Screen?
Find the screen’s mounting hardware—usually a bracket or screws on the rear—then have a second person support the screen while you remove screws so it doesn’t fall. Carefully unplug power and data cables by depressing any connector latches and pulling gently; never yank on wires. Put a rigid backing behind the screen and wrap it with bubble wrap and a moving blanket for transport. Keep the screen upright and handle it by the mount or backing—not the display surface—to avoid stressing the touchscreen layers.
How to Detach Pedals Safely Using a Pedal Wrench?
Confirm left and right pedal orientation before removal: the left pedal is reverse-threaded and loosens clockwise, while the right pedal loosens counterclockwise. Use a 15mm pedal wrench on the axle flats, apply steady leverage, and avoid sudden jerks that could strip threads. Track washers and spacers, and store pedals in individually labeled bags to protect threads. If a pedal resists, try penetrating oil and let it sit before applying more force rather than risking excessive torque that can damage the crank.
How to Adjust and Remove the Seat and Handlebars?
Before removing the seat and handlebars, note each adjustment—height, fore/aft, and tilt—using a tape measure or phone photos so you can restore your fit later. Loosen adjustment knobs or Allen bolts, slide the seat post down to free it, and remove any quick-release levers. Wrap exposed posts and rail ends with foam or bubble wrap, then place them in moving blankets to prevent scratches. Put small bolts and knobs in labeled bags and tape those bags to the underside of the seat or inside the parts box for easy retrieval during reassembly.
What Are the Steps to Separate the Frame Components?
Not all Peloton models allow frame separation; attempting to split a welded or factory-aligned frame can cause alignment issues or void warranties, so check model-specific guidance before removing frame bolts. If the frame supports partial separation, identify the joint bolts, support the bike securely, and remove fasteners while holding sections steady to prevent sudden weight shifts. Use a dolly or furniture straps for larger frame pieces, and pause and consult professionals if a bolt resists or the frame seems force-fit. Knowing when to stop prevents irreversible damage and keeps reassembly safe.
How to Pack Your Peloton Bike for Safe Moving
Packing protects each component from impact, abrasion, and vibration by combining rigid backing, cushioning, and secure fastening. The order matters: pack the screen first with a rigid backing and thorough wrap, secure fragile parts like pedals and sensors in labeled bags, then wrap the frame and handlebars in blankets. When loading the vehicle, keep the screen upright and place heavy items low to prevent shifting.
- Screens: Rigid backing plus bubble wrap and a moving blanket to prevent flex and pressure points.
- Mechanical parts: Pedals and cranks in padded bags to protect threads and faces.
- Frame and posts: Quilted blankets and stretch wrap to secure surfaces and avoid scuffs.
After packing, organize parts so reassembly follows the reverse of disassembly and keep the labeled parts box within reach when unloading.
This table pairs materials with components so you can collect supplies ahead of moving day and speed up the packing workflow.
Which Packing Techniques Protect Delicate Components?
Protect delicate components by pairing rigid backing with soft cushioning and immobilization to avoid stress and puncture points in transit. For screens, a rigid board spreads force away from the glass while bubble wrap cushions; secure the assembly with stretch wrap so it stays intact. Use padded covers for pedals and crank arms, and tape labeled parts bags to their related component so nothing gets separated. For long trips, add desiccant packets to reduce moisture around electronics during humid seasons. These techniques help fragile parts arrive ready for reassembly.
How to Label and Organize Peloton Parts for Reassembly?
A simple labeling system speeds reassembly and cuts errors: number each screw bag and create a master parts list that matches photos taken during disassembly. Photograph each step and store photos in one folder or print them and attach them to the parts box—visual cues make it much easier to reassemble correctly. Use numbered zip-top bags for fastener groups and tape the matching number to the component or mounting area. This method lets you follow the reverse sequence confidently and restore original ergonomic settings recorded earlier.
What Are the Best Practices for Reassembling Your Peloton Bike?
Reassembly follows disassembly in reverse: start with major frame components, reinstall the seat and handlebars using your recorded measurements, tighten pedals with the correct thread orientation and torque, then mount and test the screen and electronics. Verify all fasteners to manufacturer torque where specified and route cables so nothing is pinched or kinked. After reassembly, run safety checks including visual inspection, power-on diagnostics, and a short test ride to confirm sensors. If any connection feels loose or the display shows errors, address those issues before regular use.
How to Reattach the Screen, Pedals, Seat, and Handlebars?
Reinstall the screen using the mounting bracket and hand-start screws, then tighten to the specified secure torque without over-stressing threads; reconnect power and data cables and remove rigid backing before first use if it was used for transport. Install pedals using the correct threading—note the guidance provided during removal—and torque to manufacturer recommendations to protect crank threads. Restore seat and handlebar settings using your measurements or photos so you return to your original fit. Doing the steps in order helps prevent misalignment and preserves sensor calibration.
Request a free quote.
What Safety Checks Should You Perform After Reassembly?
After reassembly, visually inspect all fasteners and confirm they are seated and torqued; ensure wiring is routed without pinches and that connectors are fully clicked. Power the unit on and run a display and sensor check—confirm cadence, resistance, and power sensors register correctly during a short test ride and listen for unusual drivetrain noises. Check that the screen mount feels firm, then take a measured short ride at low resistance to watch for shifting or sounds before returning to full workouts. These checks reduce the risk of damage from missed fasteners and help ensure a safe, reliable ride.
Where to Get a Free Quote for Peloton Moving Services in Austin
If you’d rather have professionals handle your Peloton, Mountain Movers offers tailored Peloton moving services: pre-move planning, specialty packing, secure transport, and optional reassembly by trained movers who treat equipment with care. The company is family-owned and focuses on transparent pricing, stress-free scheduling, and experience with specialty items. To get an accurate estimate, be ready to share your Peloton model, move distance, and any access constraints—this helps produce a clear, transparent quote. Request a free quote.
How Does Mountain Movers Ensure Stress-Free Peloton Relocation?
Mountain Movers focuses on planning and clear communication: a pre-move assessment defines any challenges, the team uses specialty packing for electronics and delicate parts, and movers trained in safe lifting techniques reduce on-site risk. As a family-owned Central Texas company, they emphasize careful, respectful handling of customers’ belongings and flexible scheduling to meet local needs. Their approach pairs experienced people, the right equipment, and upfront expectations so owners can trust the bike will arrive safe and ready to ride.
What Are the Transparent Pricing Options for Peloton Moving?
Pricing depends on factors like move distance, building access complexity, whether disassembly/reassembly is required, and the need for specialty packing materials. Mountain Movers provides quotes that spell out what’s included so you can see whether disassembly, protective packing, transport insurance, and reassembly are bundled or itemized. To speed up the estimate, note your Peloton model, whether stairs or elevators are involved, and your distance and timing preferences to avoid surprises.
How to Contact Mountain Movers for Your Peloton Move?
- Prepare move details: Peloton model, distance, and any access constraints.
- Request an assessment: Ask for a pre-move survey to confirm scope and needs.
- Compare inclusions: Review what’s included for disassembly, packing, transport, and reassembly.
Conclusion
Disassembling your Peloton for a move greatly reduces the risk to sensitive components and helps ensure a smooth arrival at your new place. Follow the right steps and use proper tools and packing materials to protect your investment and keep it performing well. If you’d rather avoid the hassle, local professionals who specialize in Peloton moves can handle everything for you. Request a free quote today to explore options and make sure your bike arrives safely.