Austin movers know that moving a pool table is one of the most challenging tasks in the moving industry because of the table’s weight, size, and delicate components. Pool tables require special care and proper technique to avoid costly damage during transport. This guide walks you through each step of the process, from initial assessment to final reassembly in your new location. Whether you’re moving across town or across the country, following these steps helps protect your investment and keeps your table in playing condition.
Assessing the Pool Table and Surroundings
Before moving a pool table, thoroughly evaluate both the table itself and its surroundings to ensure a smooth and successful relocation. Inspect the table for any loose parts, damage, or wear that could get worse during the move. Check the pockets, rails, and felt for any signs of wear and tear. Measure the table to ensure it will fit through doorways and hallways without any issues. Also, assess the area where the table is located and where it will be moved to. Look for any obstacles, tight spaces, or delicate flooring that could create challenges during the move. By conducting a detailed assessment beforehand, you can identify and address potential issues early, helping to make the relocation process go smoothly.
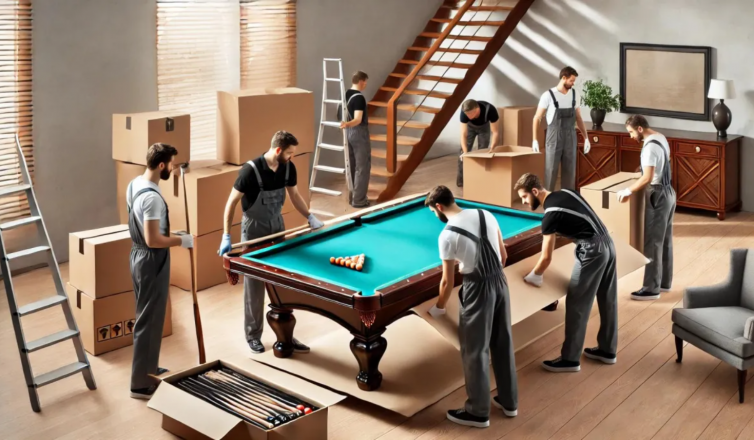
Disassembling the Pool Table
Start by carefully disassembling the pool table to prepare it for the move. Begin by removing the pockets, rails, and felt. Unscrew the bolts that hold the rails to the table and carefully lift them off. Next, please take off the felt by gently peeling it away from the slate surface. Ensure the felt remains intact to prevent tears or damage. After removing the feet, take out the slate pieces one by one. Each slate piece should be lifted carefully to avoid breakage. Remember to label and organize all parts for easy reassembly. Keep track of screws and small components in labeled bags. By taking apart the pool table carefully, you’ll help make sure the move goes smoothly without damage.
Securing and Protecting the Parts
Wrap each disassembled part in protective padding to prevent any damage during the move. This step is crucial for ensuring that all components of the pool table remain intact and free from scratches or dents. Each part, including the rails, pockets, and slate, should be securely padded to absorb any shocks or bumps that may occur during transportation. Pay special attention to corners and edges, as these areas are more prone to damage. Using moving blankets or bubble wrap can provide an extra layer of protection. By taking the time to secure and protect each part of the pool table properly, you can greatly reduce the risk of any damage during the move.
Transporting the Pool Table Safely
To transport the pool table safely, ensure that all padded components are securely loaded into the moving vehicle, distributing the weight evenly to prevent shifting during transport. Use heavy-duty straps to secure the table in place, ensuring it remains stable during the journey. Place moving blankets or additional padding on top of the table to protect the surface from scratches or dents. Avoid stacking heavy items on top of the pool table to prevent damage. Drive carefully, avoiding sudden stops or sharp turns that could cause the table to shift. By following these steps, you can transport your pool table safely to its new location without risking damage to this valuable piece of equipment.
Reassembling the Pool Table in the New Location
After arriving at the new location, carefully unpack all components of the pool table before beginning the reassembly process. Start by placing the table frame in the desired spot, making sure it’s level using a carpenter’s level. Attach the legs securely, following the manufacturer’s instructions. Next, lay down the slate, making sure it fits snugly against the frame. Use shims if needed to level the slate perfectly. Once the slate is in place, carefully reattach the felt, smoothing out any wrinkles or bubbles that may have formed. Finally, reinstall the rails, making sure they are aligned correctly and securely fastened. Take your time and double-check each step to ensure the table is reassembled accurately, providing optimal playability.
Other Related Articles: